스프링 시큐리티와 OAuth2.0으로 로그인 기능 구현
스프링 시큐리티와 OAuth 2.0으로 로그인 기능 구현
스프링 시큐리티(Spring Security)는 막강한 인증과 인과(혹인 권한 부여) 기능을 가진 프레임워크입니다.사실상 스프링 기반의 애플리케이션에서는 보안을 위한 표준이라고 보면 됩니다. 필터 기반
velog.io
위의 글에 있는 코드를 참조하여 글을 작성합니다.
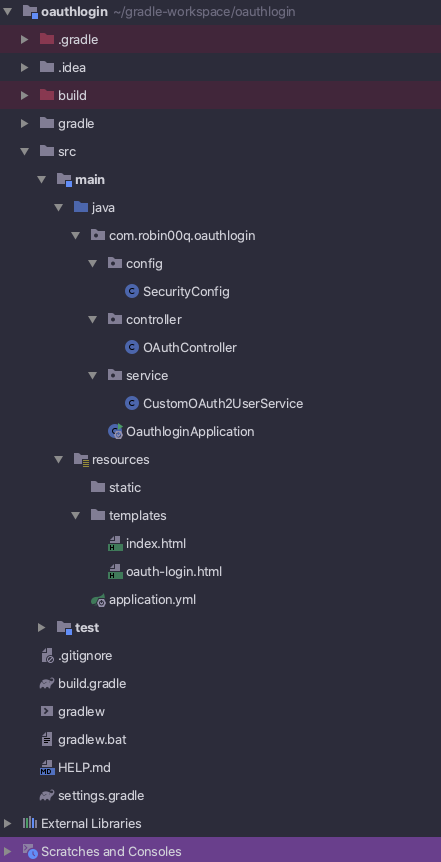
0. 패키지 구조

1. 스프링 부트 어플리케이션 생성
IntelliJ를 기반으로 스프링부트 어플리케이션을 생성합니다.
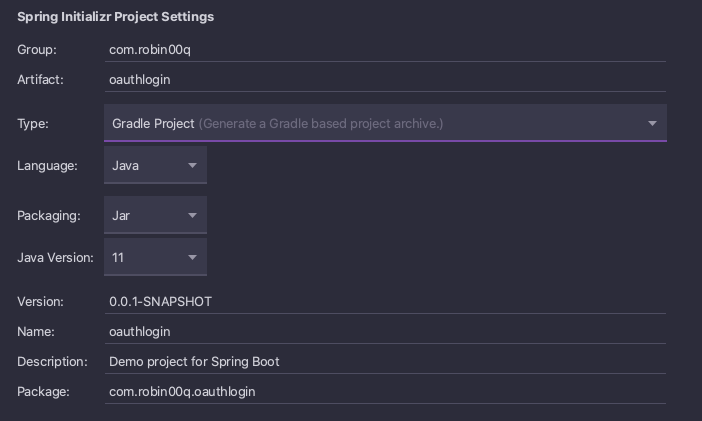
- Springboot Initializer를 이용하여 어플리케이션을 생성하겠습니다.
- gradle
- Java11 사용 (Java 8이상이면 아무거나 사용해도 무방합니다.)

- 의존성은 이와 같이 추가하였습니다.
- lombok
- Spring Web
- Spring Security
- OAuth2Client
- Thymeleaf

2. 구글 어플리케이션 등록 ( 해당 과정이 잘 안된다면 위의 블로그를 한번 참고해주세요 _O_ )
- console.cloud.google.com/
- 위의 링크에서 구글 계정을 등록할 수 있습니다.
1. 새 프로젝트를 생성해봅니다.
- 이름은 간단하게 oauth2login으로 설정했습니다.

2. API 및 서비스 대시보드로 이동합니다.
- 애플리케이션 유형
- 웹 애플리케이션
- 이름
- oauth2login
- 승인된 리다이렉션 URI(기억해주세요)
- http://localhost:8080/login/oauth2/code/google

해당 과정에서 승인된 리다이렉션 URI를 기억해주세요
3. application.yml 작성
- resources 디렉토리 아래에 application.yml을 작성하고 구글 로그인에 대한 설정을 입력합니다.
spring:
  security:
    oauth2:
      client:
        registration:
          google:
            client-id: "YOUR CLIENT ID"
            client-secret: "YOUR CLIENT SECRET"
            scope:
              - profile
- email- 해당 설정은 OAuth2ClientProperties.Java 파일에서 읽어집니다.
- IntelliJ에서 Shift키를 2번 눌러 OAuth2LoginProperties.java 를 찾아봅니다.
- 해당 코드 내에서 @ConfigurationProperties(prefix = "spring.security.oauth2.client") 를 통해 읽어들이는 것을 확인할 수 있습니다.
@ConfigurationProperties(prefix = "spring.security.oauth2.client")
public class OAuth2ClientProperties {
...

	public static class Registration {

		private String provider;

		private String clientId;

		private String clientSecret;

		private String clientAuthenticationMethod;

		private String authorizationGrantType;

		private String redirectUri;

		private Set<String> scope;

        ...
   }
   ...

}
4. 스프링 시큐리티 설정
- SecurityConfig.java 만듭니다.
- 아직 CustomOAuth2UserService를 만들지 않았기 때문에 빨간줄이 뜨는 것이니 일단 넘어가도록 합시다.
- 코드설명
- .authorizeRequests()
- 인증이 된 경우에만 접근을 가능하게 하거나 접근을 차단하는 기능을 제공합니다.
- 아래의 코드에서는 /oauth-login의 url에서는 모두다 접근을 허용하도록 만듭니다. (로그인은 해야하니까)
- .anyRequest()
- authorizeRequests() 에서 설정한 나머지에 대해서 설정합니다.
- anyRequest().authenticated() => 나머지 접근에 대해서는 인증된 사용자만 접근 가능하게 합니다.
- .oauth2Login()
- oauth2Login에 대한 설정을 시작하겠다는 것을 의미합니다.
- userInfoEndpoint().userService(customOAuth2UserService)
- oauth2Login에 성공하면 customOAuth2UserService에서 설정을 진행하겠다라는 의미입니다.
- .authorizeRequests()
@RequiredArgsConstructor
@EnableWebSecurity
public class SecurityConfig extends WebSecurityConfigurerAdapter {

    private final CustomOAuth2UserService customOAuth2UserService;

    @Override
    protected void configure(HttpSecurity http) throws Exception {
        http
                .authorizeRequests()
                    .antMatchers("/oauth-login").permitAll() // login URL에는 누구나 접근 가능하게 합니다.
                .anyRequest().authenticated() // 그 이외에는 인증된 사용자만 접근 가능하게 합니다.
            .and()
                .oauth2Login() // oauth2Login 설정 시작
                    .userInfoEndpoint() // oauth2Login 성공 이후의 설정을 시작
                        .userService(customOAuth2UserService); // customOAuth2UserService에서 처리하겠다.
    }
}
5. customOAuth2UserService 작성
- 위에서 oauth2Login이 성공한 이후 과정은 customOAuth2UserService에서 진행하기로 코드를 구현했습니다.
- 일단은 아래와 같이 구현해봅니다.
- 코드 설명
- DefaultOAuth2UserService는 OAuth2UserService의 구현체입니다.
- 해당 클래스를 이용해서 userRequest에 있는 정보를 빼낼 수 있습니다.
- objectMapper를 이용해서 json 형식으로 출력해 보기 위해서 아래와 같이 구현합니다.
- DefaultOAuth2UserService는 OAuth2UserService의 구현체입니다.
@RequiredArgsConstructor
@Service
public class CustomOAuth2UserService implements OAuth2UserService<OAuth2UserRequest, OAuth2User> {

    @SneakyThrows
    @Override
    public OAuth2User loadUser(OAuth2UserRequest userRequest) throws OAuth2AuthenticationException {

        OAuth2UserService delegate = new DefaultOAuth2UserService();
        OAuth2User oAuth2User = delegate.loadUser(userRequest);

        System.out.println(new ObjectMapper().writerWithDefaultPrettyPrinter().writeValueAsString(userRequest));
        System.out.println(new ObjectMapper().writerWithDefaultPrettyPrinter().writeValueAsString(oAuth2User));
    }
}
6. controller / 화면 작성
- 일단 로그인을 할 수 있는 기능까지는 모두 구현이 된 상태이기 때문에 간단한 컨트롤러를 작성해봅니다.
- 위에서 security 설정을 할 때
- /oauth-login인 경우에만 모두다 접근을 허용하기로 했으므로
- @GetMapping("/oauth-login") 으로 설정합니다.
- 타임리프 의존성을 설정했으므로
- return "oauth-login"을 설정하면
- http://localhost:8080/oauth-login을 입력하면
- resources/templates/oauth-login.html로 접근하게 됩니다.
- return "oauth-login"을 설정하면
@Controller
public class OAuthController {

    @GetMapping("/oauth-login")
    public String login() {
        return "oauth-login";
    }
}
- 로그인 할 수 있는 화면을 작성합니다.
- resources/templates 아래에 oauth-login.html 파일을 생성한 뒤 아래와 같이 작성합니다.
- 간단하게 구글 oauth2로 이동하는 링크만 있을 뿐, 다른것은 없습니다.
<!DOCTYPE html>
<html lang="en">
<head>
    <meta charset="UTF-8">
    <title>Title</title>
</head>
<body>

<h1>구글 로그인을 해보자</h1>

<a href="/oauth2/authorization/google" class="btn btn-success active" role="button">Google Login</a>
</body>
</html>
- 성공시에 메인 화면으로 리다이렉트 되므로 메인화면도 간단하게 작성합니다.
<!DOCTYPE html>
<html lang="en">
<head>
    <meta charset="UTF-8">
    <title>Title</title>
</head>
<body>

<h1>메인화면</h1>
</body>
</html>
7. 로그인 해보자
- 어플리케이션을 구동한 뒤
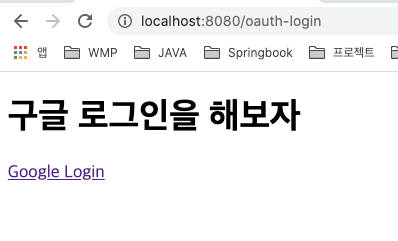
- localhost:8080/oauth-login으로 접속하면 아래와 같은 화면이 보입니다.

Google Login을 클릭하여 로그인 한 뒤 콘솔창을 봅니다. (로그인은 실패합니다.)
- System.out.println(new ObjectMapper().writerWithDefaultPrettyPrinter().writeValueAsString(userRequest));
{
  "clientRegistration" : {
    "registrationId" : "google",
    "clientId" : "구글에 등록한 ClientId",
    "clientSecret" : "구글에 등록한 ClientSecret",
    "clientAuthenticationMethod" : {
      "value" : "basic"
    },
    "authorizationGrantType" : {
      "value" : "authorization_code"
    },
    "redirectUriTemplate" : "{baseUrl}/{action}/oauth2/code/{registrationId}",
    "scopes" : [ "profile", "email" ],
    "providerDetails" : {
      "authorizationUri" : "https://accounts.google.com/o/oauth2/v2/auth",
      "tokenUri" : "https://www.googleapis.com/oauth2/v4/token",
      "userInfoEndpoint" : {
        "uri" : "https://www.googleapis.com/oauth2/v3/userinfo",
        "authenticationMethod" : {
          "value" : "header"
        },
        "userNameAttributeName" : "sub"
      },
      "jwkSetUri" : "https://www.googleapis.com/oauth2/v3/certs",
      "configurationMetadata" : { }
    },
    "clientName" : "Google"
  },
  "accessToken" : {
    "tokenValue" : "토큰값",
    "issuedAt" : {
      "nano" : 255772000,
      "epochSecond" : 1605008163
    },
    "expiresAt" : {
      "nano" : 255772000,
      "epochSecond" : 1605011762
    },
    "tokenType" : {
      "value" : "Bearer"
    },
    "scopes" : [ "https://www.googleapis.com/auth/userinfo.profile", "https://www.googleapis.com/auth/userinfo.email", "openid" ]
  },
  "additionalParameters" : {
    "id_token" : "토큰값"
  }
}
- System.out.println(new ObjectMapper().writerWithDefaultPrettyPrinter().writeValueAsString(oAuth2User));
{
  "authorities" : [ {
    "authority" : "ROLE_USER",
    "attributes" : {
      "sub" : "구글에서의 Primary Key 값",
      "name" : "이석준",
      "given_name" : "석준",
      "family_name" : "이",
      "picture" : "그림값",
      "email" : "이메일값",
      "email_verified" : true,
      "locale" : "ko"
    }
  }, {
    "authority" : "SCOPE_https://www.googleapis.com/auth/userinfo.email"
  }, {
    "authority" : "SCOPE_https://www.googleapis.com/auth/userinfo.profile"
  }, {
    "authority" : "SCOPE_openid"
  } ],
  "attributes" : {
    "sub" : "구글에서의 Primary Key 값",
    "name" : "이석준",
    "given_name" : "석준",
    "family_name" : "이",
    "picture" : "그림값",
    "email" : "이메일값",
    "email_verified" : true,
    "locale" : "ko"
  },
  "name" : "이름값"
}
해당 값들에는 우리가 지금까지 설정한 정보들이 거의 모두 들어있습니다.
- userRequest에는 구글에 요청하는 어플리케이션의 요청값들인
- application.yml에서 설정하여 OAuth2LoginProperties.java 에 의해 읽혀진
- registrationId
- clientId
- clientSecret
- scope + 알파값들
- redirectUrlTemplate 정보 등..
- 스프링 security 2.0 부터는 redirection endpoint가
- /login/oauth2/code/* 로 default 값이므로 별도의 처리를 하고 싶지 않다면 위에서 기억하라고 했던 포맷을 유지하는게 좋습니다.
- (참고) docs.spring.io/spring-security/site/docs/5.0.7.RELEASE/reference/html/oauth2login-advanced.html#oauth2login-advanced-redirection-endpoint
- 스프링 security 2.0 부터는 redirection endpoint가
- application.yml에서 설정하여 OAuth2LoginProperties.java 에 의해 읽혀진
- oAuth2User에는 본인의 개인정보들 (구글 아이디에 대한)
- 따라하신 분들은 본인의 개인정보가 들어있을 겁니다.
- 하지만 아직 에러가 나므로 return 값을 null이 아닌
- loadUser의 포맷에 맞춰 리턴해주도록 합니다.
@RequiredArgsConstructor
@Service
public class CustomOAuth2UserService implements OAuth2UserService<OAuth2UserRequest, OAuth2User> {

    @SneakyThrows
    @Override
    public OAuth2User loadUser(OAuth2UserRequest userRequest) throws OAuth2AuthenticationException {

        OAuth2UserService delegate = new DefaultOAuth2UserService();
        OAuth2User oAuth2User = delegate.loadUser(userRequest);

        System.out.println(new ObjectMapper().writerWithDefaultPrettyPrinter().writeValueAsString(userRequest));
        System.out.println(new ObjectMapper().writerWithDefaultPrettyPrinter().writeValueAsString(oAuth2User));

        String userNameAttributeName = userRequest
                .getClientRegistration()
                .getProviderDetails()
                .getUserInfoEndpoint()
                .getUserNameAttributeName();


        return new DefaultOAuth2User(
                Collections.singleton(new SimpleGrantedAuthority("ROLE_USER")),
                oAuth2User.getAttributes(),
                userNameAttributeName
        );
    }
}
- 위처럼 구현하여
- DefaultOAuth2User의 권한을 가진 User를 load합니다.
- DefaultOAuth2User에 들어가보면 생성자는 아래와 같습니다.
- 아래 포맷에 맞추어 위의 코드처럼 작성한다면 이제 로그인 기능이 작동합니다.
public DefaultOAuth2User(Collection<? extends GrantedAuthority> authorities,
					Map<String, Object> attributes, String nameAttributeKey) {
추가로 해보세요
- 현재 권한을 "ROLE_USER" 로 줬습니다.
- 스프링 시큐리티의 권한 코드는 항상 "ROLE_" 로 시작해야합니다
- 해당 권한은 4. 스프링 시큐리티 설정 부분에서 .antMatchers("어떤 페이지").hasRole("USER") 를 통해 해당 페이지는 "ROLE_USER" 권한이 있는 사람만 갈 수 있도록 합니다.
- hasRole 부분에 "USER" 이라는 뜻은 "ROLE_USER"을 부여받은 사람은 접근할 수 있다는 뜻입니다.
제가 맨 위에 참조한 블로그에 이미 해당 구현을 해 놓은 부분이 있으므로 참고하시면 될 것 같습니다.
그럼 20000...
문제가 있는 부분이 있다면 댓글이나 / robin00q@naver.com 으로 이메일 주시면 반영하겠습니다 ^_^